
Comments sowed the seeds of doubt about whether HDR photography is worth the trouble. As a hobbiest I have not really spent much time manually manipulating RAW format pictures. My camera (Canon G6) has a 10 bit per pixel sensor, which gets then compressed to 8 bits per pixel in the JPG. That is potentially 10 f-stops (EV) of dynamic range. Somewhere I found a web page listing the G6 as having a luminosity range of 1:650, which is between 9 and 10 EV. I hear better cameras can get 10 to 11 EV. Maybe, as you say, that is enough. Clearly combining pictures taken +2 EV, and -2 EV could potentially potentially add 3 or 4, giving the total range around 13 or 14 EV. How do I know whether I need the extra range?
How important is this dynamic range, anyway? The human eye records an instantaneous dynamic range of 1:30,000, a range of 1:200,000 if you allow a couple of seconds for the iris adjust, and 1:1,000,000 if you wait 20 minutes for the eyes to adjust to darkness. All of these make the 1:1000 of a camera seem tiny. But how much do you really need?
I set out to take a some photographs to see whether I really need to purchase the Photomatix software, or whether this is just a fad promoted by photo perfectionists. The first picture was a tree in the courtyard of the Fujitsu campus in Sunnyvale. I recorded the pictures in RAW format, and took a large number of different exposures, each about 1 EV apart. I then compared two results: the first is from combining all the different exposures into a single HDR image, and then tone mapped that back to a JPG. The second was by taking a single RAW image, the one at the “correct” exposure, converting that to HDR, and tonemapping with the exact same setting. (I am too lazy to link this photo, sorry.)
First thing I have to say is that the results with the RAW image were dramatically more stunning than doing the manipulation from the JPG generated by the camera. I will certainly do more of this in the future. I have to say, on this first photo, the results of the single exposure, and multiple exposure were essentially the same! The colors were great, the picture clear, and the dark and highlights were without problem. What I found out is that this first photo did not need the high dynamic range. I think that will be the case in many pictures, just as Bruce suggested.
The second picture, however, convinced me to get the software. This is a picture of a fountain in the sun which is very bright, but includes the dark side of a tree, as well as a lot of dark details on the building in the background. I took a total of 7 different exposure settings in RAW format. (Since then I have found that it is unnecessary to take so many, but this is how I learned that.) Again, I processed two examples: the combined HDR, and an HDR made from the single best exposure. I was careful to use the exact same tome mapping for the output. This is a little unfair because you might do the tone mapping a little different for the single exposure, to bring out the blue in the sky a bit more, but I wanted to be able to exactly compare the results.
First of all, here are the two photographs, reduced to fit on the page. The first is the single exposure, which the second is the photo made from combining 7 exposures. Please see the links at the bottom of the blog entry for links to the full size (7.1 Megapixel) images.
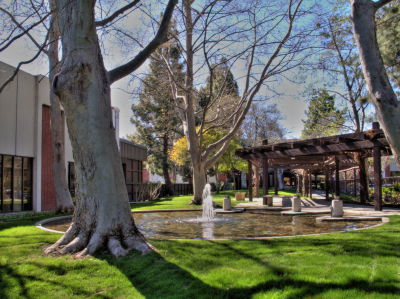
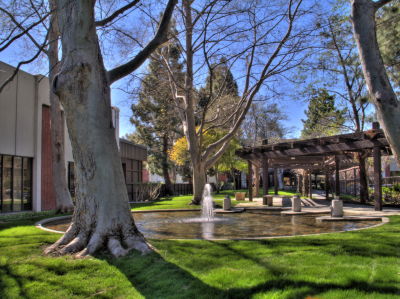
Most of the picture appear the same at this scale. You notice mostly that the sky is bluer in the combined exposure photo, because the single exposure tended to wash out the color a bit because the sky was a little over exposed. But the trees, the grass, the fountain, the buildings look pretty much the same.
The fountain is in the sun, and it is very bright. The biggest difference between these images is seen when you look closely at the fountain:
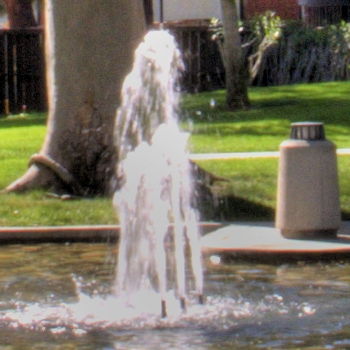
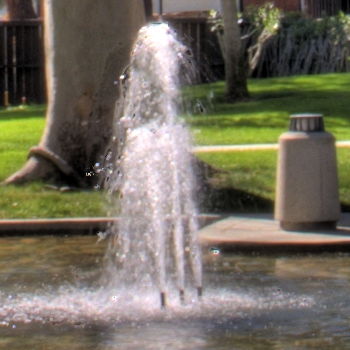
The difference here is dramatic! The fountain was bright enough that it was completely overexposed in the single exposure shot. The multiple exposure shot, however, used information from the darker pictures to get a clearer impression of the fountain.
How about the dark places? Maybe the original single exposure picture was simply overexposed. This also shows a dramatic difference:
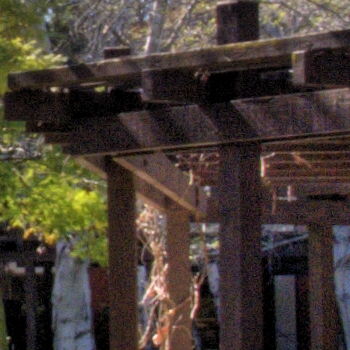
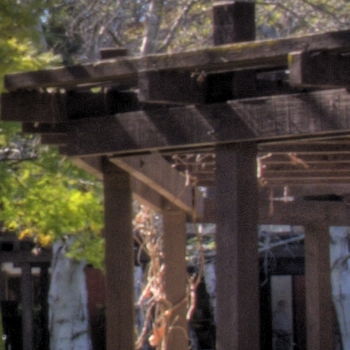
Notice how speckled the rafters appear in the single exposure image. This is noise that is appearing at the dark end of the luminosity range. The multiple exposure image is dramatically cleaner, because the image information for this part of the picture was taken from photos that were otherwise over exposed. Notice in the multiple exposure image you can see some wood grain in the front most board, and how much clearer the details in the vines in the background are.
What this demonstrates is that for this picture, the single exposure could not capture both the bright areas, and the dark areas at the same time, but the image made from combining multiple exposures did this beautifully. That was enough for me, and I purchased Photomatix this morning.
I took these pictures with 1 EV spacing, requiring 5 or 7 images. In hindsight, it should be fine to use 2 EV spacing, and in general 3 exposures will probably do. This will be much more convenient since the camera will do exposure bracketing with 3 photos, spaced 2 EV settings apart, so that all the pictures can be taken without touching the camera, which will reduce the chance of shifting the camera direction. This should be fine for all but the most extreme shots.
The combined HDR image was 23.8 MB, and each of the 7 RAW images were 8.8 MB. These pictures were taken on March 15 2007, at about 3:30 in the afternoon, on the Fujitsu campus in Sunnyvale.
